Sunday, February 28, 2010

Cinnamon Apple Swirl Bread

Here is another delicious recipe from Recipezaar.  I made this bread before years ago and came across it again a few weeks ago, while I was bored.  Mmmm, it’s good stuff. 

It’s very similar to a cinnamon raisin bread, except you use apples!  Which is perfect for me because I’m not a fan of raisins but I happen to LOVE apples.  In making this, I made a few substitutions (surprise, surprise, right?).  First, I used half whole wheat flour because I usually use that in my baking and I prefer whole wheat bread.  Secondly, I didn’t have any “real” butter, so I used Smart Balance buttery spread and it worked great!  Third, I used Gala apples and mixed, chopped nuts.

This bread takes a little while to make, due to the rising and such, but it’s worth it.  You get two loaves and they freeze very well.  One word of advice, next time I make this I plan to just roll it all up like a jelly roll from one end, as opposed to from both ends.  My reasoning would be that I like to eat this bread toasted with a bit of Smart Balance, but on some pieces the bread didn’t “connect together” and it broke in my toaster.  Which now leaves me with little pieces of apple and nuts and the bottom that get charred every time we make toast. :)

Enjoy!

IMG_2056

Ingredients.

IMG_2058

Apple, cinnamon and nut filling.

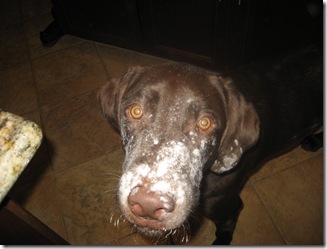
IMG_2057   

Diesel likes to help me cook…even when I get a little messy.

 IMG_2060

Pre-baked.

IMG_2061

Right out of the oven.

IMG_2063

Swirly!

Cinnamon Swirled Apple Bread
Ingredients
  • 5 1/2-6 cups all-purpose flour
  • 1 (1/4 ounce) package active dry yeast
  • 1 cup milk
  • 3 tablespoons granulated sugar
  • 3 tablespoons butter
  • 3/4 teaspoon salt
  • 2 eggs
  • 1 cup shredded apple
  • 1 1/2 cups finely chopped peeled apples
  • 1/2 cup finely chopped walnuts or pecans, toasted
  • 1/2 cup packed brown sugar
  • 2 teaspoons ground cinnamon
  • 2 tablespoons butter, softened
  • 1 slightly beaten egg white
  • 1 tablespoon water
  • coarse sugar
Directions
  1. In a large mixing bowl combine 2 cups of the flour and the yeast; set aside.
  2. In a saucepan heat and stir milk, granulated sugar, the 3 tablespoons butter, and the salt until warm (120° to 130°) and until butter almost melts.
  3. Add milk mixture to dry mixture along with eggs.
  4. Beat with an electric mixer on low to medium speed for 30 seconds, scraping side of bowl constantly.
  5. Then beat on high speed 3 minutes.
  6. Stir in shredded apple.
  7. Using a wooden spoon, stir in as much remaining flour as you can.
  8. Turn dough out onto a lightly floured surface.
  9. Knead in enough of the remaining flour to make a moderately stiff dough that is smooth and elastic (6 to 8 minutes total).
  10. Shape into a ball. Place in lightly greased bowl, turning once to grease surface.
  11. Cover; let rise in a warm place until double (about 1 hour. Punch dough down.
  12. Turn dough out onto a lightly floured surface. Divide in half Cover; let rest 10 minutes.
  13. Lightly grease two 8x4x2- or 9x5x3-inch loaf pans.
  14. Meanwhile, for filling, in a medium mixing bowl combine chopped apple, nuts, brown sugar, and cinnamon; set aside.
  15. Roll half of the dough to a 14x9-inch rectangle. Spread with 1 tablespoon of the softened butter; sprinkle with half of the filling.
  16. Beginning at both short ends, roll each end up, jelly-roll style, to center.
  17. Place loaf, rolled side up, in a prepared loaf pan. For second loaf, repeat with remaining dough, remaining butter, and remaining filling.
  18. Cover, let rise until almost double in size (about 30 minutes).
  19. Stir together egg white and water. Brush egg white mixture over tops of loaves; sprinkle with coarse sugar.
  20. Bake in a 375° oven for 30 to 40 minutes or until bread sounds hollow when you tap tops (if necessary, loosely cover with foil for the last 15 minutes of baking to prevent overbrowning).
  21. Immediately remove from pans. Cool on wire racks.

Wednesday, February 24, 2010

We Have a Winner!

Hello friends!  First of all, thanks for all of those who commented and entered my GIVEAWAY to win a bottle of Skin MD Natural Shielding Lotion.  According to the Random Number Generator on Random.org, the lucky winner is #1 – Natalie from The Sweets Life blog!  Yay!!  Congratulations, Natalie. 

Random

Thanks to all who participated in my GIVEAWAY and I hope to have to opportunity for more GIVEAWAYS in the future.  Stay tuned tonight or tomorrow for another delicious recipe: Cinnamon Apple Swirled Bread.  Yum!

Thursday, February 18, 2010

A Review, a GIVEAWAY & Derby Pie

Boy, this is going to be one packed post!  Bare with me though because it’s good.  I promise.

  First, we have a review!  A few weeks ago, I was contacted by Skin MD Natural asking me if I’d be interested in receiving one of their products and reviewing it.  Heck yea, I would!  I’m so glad that I was able to receive a sample of their Shielding Lotion because this stuff is awesome!


Living in AZ for the majority of my life, I’ve always had skin that was more on the dry side.  Ever heard people in AZ say, “Oh, it’s a dry heat?”  Well, they weren’t kidding!  Add winter on top of that and then the fact that I’m always washing my hands…it all leaves me with dry skin.  The first time I used the shielding lotion, my skin was instantly moisturized and soft, and I was surprised that it stayed that way through most of the day!  Plus, the lotion is very light, non-greasy, fragrance free and a little goes a long way.  I love that!  I’ve been using the Shielding Lotion for about a week now and the overall appearance of my skin has improved greatly.  No more rough hands or dry cuticles, just soft, smooth skin.  It’s wonderful!   Check out these cool facts about Skin MD’s Shielding Lotion:

  • It’s natural, eco-friendly
  • It’s unlike any other conventional, artificial moisturizers because it works with the skin to naturally moisturize and heal
  • It helps restore skin's natural protective abilities by bonding to the outer layer of skin, strengthening skins natural barrier against toxins and irritants that can dry the skin, while locking in the
    skin's natural oils
  • It’s made in the US, using high quality natural ingredients, making it over 90% all natural
  • It’s free of harmful fragrances, parabens, and colorants making it hypoallergenic
  • It’s also vegan-friendly and gluten-free

Pretty cool stuff, right?  I highly recommend this lotion to those with dry skin…in fact, let me help you with that: secondly, we have a GIVEAWAY!  I’ll be randomly selecting one lucky reader to win a full size bottle of the Skin Natural MD Shielding Lotion on Tuesday, February 23rd at 12pm AZ time and here’s how you enter:

  1. Leave a comment telling me why your skin is so dry.
  2. Tweet the following: “@saraboff from Sara’s Sweets is having a Skin Natural MD giveaway and I want to win! http://bit.ly/afPaAA,” then, leave a comment telling me you’ve done so.
  3. Blog: If you have a blog of your own, mention my giveaway in a post, then leave a comment telling me you’ve done so.

That’s it!  Good luck!

Lastly, we have a recipe.  A very delicious recipe, I might add.  One of the blogs that I frequent is Iowa Girl Eats.  Kristin has some delicious recipes, plus great tips on exercise and being healthy.  A few months ago, she posted this recipe and I knew that I had to make it! 

Kentucky Derby Pie is basically a chocolate chip cookie pie.  I know, right!  A chocolate chip cookie pie?! = AMAZING!  I followed the recipe to a “t” and it rocked my world.  Stop reading right now, go to the store, buy the ingredients and make this asap!  It is THAT good.

 IMG_2052

Ingredients.

IMG_2054

Done baking.

IMG_2055

You have to eat it while it’s still warm!  Oh my goodness!

Kentucky Derby Pie, by Iowa Girl Eats

Ingredients

  • 1 stick butter, softened
  • 1 cup sugar
  • 2 eggs
  • 1 teaspoon vanilla
  • 1/2 cup flour
  • 1 cup chopped pecans
  • 6 oz. semi-sweet chocolate chips
  • dash of salt
  • 1 frozen deep dish pie crust

Directions

  1. Pre-heat oven to 325 degrees. Cream butter and sugar until light and fluffy. Add eggs, one at a time and mix well after each egg. Add vanilla and mix.
  2. Combine remaining ingredients into mixture and spoon into pie shell. Bake for 55-60 minutes, or until golden brown on top. Serve warm!

Sunday, February 7, 2010

Brownies

Jeremy loves brownies.  I’m not the biggest fan of them, but of course, I’d eat one if it were offered to me.  Unless, of course, there were also cookies.  If I had to pick between cookies and brownies, I’d take cookies in a heartbeat, but that’s not the point.  I was bored one afternoon and asked Jeremy if he would like some brownies.  Sure enough, he said yes, so off to baking I went.

This recipe comes from Recipezaar.com and I’ve actually made these brownies a few time before.  People have always loved them!  They are easy to make, moist and very chocolatey.  Plus, you can add whatever”goodies” you like! (I added nuts and chocolate chips)  In all honesty though…I think they are a little too rich.  I know what you’re probably thinking, “Sara, how can a brownie be too rich?”  Call me crazy, but maybe it just comes down to the fact that brownies wouldn’t be my dessert of choice.  Dont’ get me wrong, they are still good…it’s just that I can’t eat more than a small piece before I'm all chocolated out.  So, if you’re looking for an easy and rich brownie, this is your recipe.

Enjoy!

 IMG_2037

Ingredients.

IMG_2038

Right out of the oven.

IMG_2039

Milk is necessary with this brownie.

“Whatever Floats Your Boat” Brownies, by Recipezaar

Ingredients

  • 1/2 cup butter, melted
  • 1/2 cup unsweetened cocoa
  • 1 cup sugar
  • 2 eggs
  • 2 teaspoons vanilla
  • 1/2 cup flour
  • 1/4 teaspoon salt

WHATEVER FLOATS YOUR BOAT

1-2 cup chocolate chips (semisweet, white, butterscotch, peanut butter) or raisins or chopped maraschino cherry or chopped nuts or M&M' or Reese's pieces or miniature marshmallow

Directions

  1. Preheat oven to 350°F.
  2. Grease an 8 inch square pan or line with foil.
  3. In a medium bowl combine melted butter and cocoa and stir until cocoa is dissolved.
  4. Add sugar and mix well.
  5. Add eggs one at a time and stir until well combined.
  6. Stir in vanilla, flour and salt until you no longer see any flour (do not overmix).
  7. Fold in "WHATEVER FLOATS YOUR BOAT"!
  8. Spread in pan and bake for approximately 25 minutes.
  9. DO NOT OVER-BAKE -- your brownies will come out dry. Adjust time/temp accordingly for your oven. If you do the knife/toothpick test, it should come out with moist crumbs, not clean.
  10. Cool completely before cutting into squares.

For double recipe, bake in 9x12 pan and add 5 minutes to baking time.  Makes 16 brownies.